Summer is the ideal season to host visitors and savor reviving drinks. One better approach to accomplish that is using a chic and useful little drink bucket. “Swap It Like It’s Hot” is all about giving something old a fresh, interesting use.
This do-it-yourself instruction will show you how to turn a common object into a stylish little drink bucket the highlight of your events. This project will wow your visitors whether you are planning a picnic, a backyard barbecue, or a small interior get-together.
Materials Required
Get ready by compiling the following resources:
- Wood or metal bucket
- Sandpaper (should one be using a wooden bucket)
- Choose your color in either spray or paint.
- Clear sealant (should one be using paint)
- Handles (optional)
- Ornamental accents (decals, stencils, stickers, stencers)
- Ice and drinks.
Assembling the Bucket
Here’s how to prepare a mini drinks bucket:
Select Your Bucket
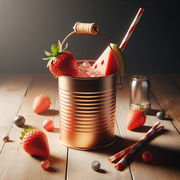 Choosing a fitting container comes first. For a more industrial effect, use a metal bucket; for a rustic vibe, use a wooden bucket. Make sure the bucket is small enough to be conveniently transported yet big enough to store ice and numerous drinks.
Sanding and Sanitation
Starting with sanding a wooden bucket to smooth out any rough edges and guarantee the surface is painting ready, To eliminate any dust, filth, or oil from both metal and wooden buckets, give their surfaces careful cleaning.
Painting and Decoration
Putting colors and decors to your bucket may make it more lively and attractive:
1-Executing the Base Coat
- Select a paint color that accentuates your furniture and matches the concept of your event.
- Apply a basis coat with spray paint or a brush. Applying several coats lets each one dry completely before applying the next, therefore producing a more vivid appearance.
2-Paint Sealing
- Apply a clear sealer to preserve the paint and strengthen the bucket once it has completely dried. If you intend to often use the bucket outside, this is particularly crucial.
Putting Ornamental Features
Add decorative items to personalize your little drink bucket. Stencils, decals, or stickers will let you design patterns or write a fun note. Rustic rope handles or metallic accents will accentuate style even further.
Putting Together the Mini Drink Bucket and Installing Handles
Should your bucket not already feature handles, think about installing some for simpler mobility. For a more rustic design, you may fasten metal handles or utilize rope. Make sure they are strong enough to bear ice and liquid weight and properly fastened.
Completing the Bucket
Stow your preferred drinks and ice in the bucket. You can combine several beverages to satisfy every taste. Furthermore improving the presentation and taste of the beverages is adding some fresh herbs or slices of citrus fruits.
In Summary
Making a “Swap It Like It’s Hot” tiny drink bucket is a pleasant and interesting do-it-yourself project that gives your gathering area some individual character. Not only will you produce a useful object but also help with sustainable living by repurposing an old bucket and giving it a fashionable makeover. Your guests will love this little drink bucket whether you are throwing a laid-back get-together or a summer celebration. Value the compliments and the cool beverages! To sustainability and ingenuity!