Turning an old dresser into a chic bar is one great approach to revitalizing your furniture and producing a distinctive and useful component for your house. Perfect for your home décor, this do-it-yourself project blends design, utility, and elegance. With advice and tools to guarantee a beautiful and valuable outcome, this article will lead you through the process of finishing your dresser bar DIY project.
Choosing and Arranging the Dresser
Here are the steps to correctly select the dresser that you want:
Selecting the appropriate dresser
Choosing the correct dresser marks the first stage in your do-it-yourself dresser bar project. Search for a piece that fits your general look, is robust, and offers enough storage. Thrift stores, flea markets, and garage sales are excellent venues to find a decent dresser at a reasonable price.
Refining and Sanding
Once you have your dresser, start by giving it a thorough cleaning to remove any old paint, dirt, or grime. Sand the entire surface to produce a smooth basis for staining or painting. For the first sanding, use medium-grit sandpaper; for a polished finish, follow up with fine-grit sandpaper. Wipe away any dust with a moist cloth.
Staining or Painting the Dresser
The next stage to do for your DIY dresser project is to paint it. You can achieve that through the following steps:
Making a Final Decision
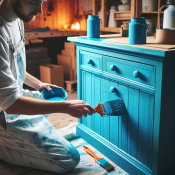 Choose to stain or paint your dresser. While stain accentuates the natural wood grain for a more rustic effect, paint offers a solid color and can brighten your room. Choose a finish to match your house décor.
Finish Application
If painting, first guarantee even coverage by applying a coat of primer. Once the primer has dried, apply two coats of paint; let each coat dry completely before adding the next. If staining, follow the wood grain, brush, or cloth and apply the stain. Remove any extra stains, then let them completely dry. Finish with a surface-protecting clear topcoat or sealer.
Adding Bar Features
To have a more bar look for your DIY dresser bar, follow the steps below:
Storage and Shelving
Create shelves or storage spaces from the dresser drawers for your bar needs. Remove the drawers and add shelf bracers if you wish to open shelves. You may line the drawers with non-slip mats to keep glasses and bottles safe. Add organizers or dividers to set off particular areas for several objects.
Grape Rack with Glass Holder
Consider adding a wine rack and glass holder to your dresser bar for a functional and fashionable accent. To store your wine bottles horizontally, set up a wine rack in one of the drawers or compartments. To readily access wine glasses, hang them from a glass holder under one of the shelves.
Ornamental Highlights
Use creative embellishments to improve your dresser bar’s overall appearance. Arrange a mirror or ornamental backsplash to establish a focal point behind the dresser. To give the drawers some beauty, choose chic handles or knobs. Arrange your best bottles, glasses, trays, bar tools, and dresser-top decorations.
Summary
Completing a do-it-yourself dresser bar project can make your house décor distinctive and useful. If you choose the correct dresser, apply a gorgeous finish, and add useful bar elements, your living area will look great, and your guests will be amazed. Enjoy the process of turning your dresser into a bar, and cheers on your new, fashionable addition!