When it comes to home décor, it can be rather fun to hunt original and imaginative items to accentuate your area. Reversing tractor tire rims into fashionable and useful ottomans is one creative approach to add a little of rustic appeal and industrial elegance into your house. This do-it-yourself technique not only gives old items fresh life but also produces a visually arresting discussion piece with utility.
This guide will walk you through the process of designing your own tractor tire rim ottoman from a basic piece of farm equipment, thereby turning it into a remarkable décor accent.
Required Materials
Get the following ready before you start:
- Tractor tire rim (rust-free, clean)
- Wooden board or plywood cut to match the diameter of the rim.
- Padding foam fabrics or upholstery materials
- Strong-duty glue gun or adhesive
- Optional, for the rim, spray paint
- Screws and drills
- Measuring tape
- Scissors
- Staple gun
Arranging the Tire Rim
Here is the process of preparing your old tractor truck rim for refurbishing:
1-Cleaning and Painting
When you are preparing the tire rim, make sure everything is spotless and devoid of trash or rust. Should the rim show rust, sand it down to provide a smooth surface. For a rustic style, leave the rim unaltered; alternatively, spray paint it in a color that accentuates your furniture. Before going on to the following stage, let the paint dry totally.
2-Developing the Seat Base
Calculate the rim’s diameter and then cut a plywood or wooden board piece to fit tightly within the rim. Your ottoman will have its foundation here. Make sure the wood can handle weight.
Putting the Ottoman Together
Now, it’s time to put up the ottoman through the following steps:
1-Addition of Padding from the Foam
Cut foam cushioning to suit the wooden base. For the ottoman, the foam will be cushioned and comforting. Securely fasten the foam to the hardwood foundation using a glue gun or heavy-duty adhesive.
2-Stuffing the Seat
Select upholstery or cloth that accentuates the color of the rim and fits your décor. Cut the fabric extra enough to staple beneath, covering the foam and the wooden base’s edges.
Lay the foam-sided cushioned wooden base down on the fabric. To guarantee it is smooth and wrinkle-free, tightly pull the cloth over the foam and staple it to the bottom of the wooden foundation.
3-Getting the Seat on the Rim
Nest the upholstered seat into the tractor tire rim. To guarantee strong attachment, fasten the wooden base to the rim using screws and a drill. Verify once more whether the seat is firmly attached.
Final Touches: Customizing Your Ottoman
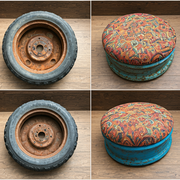 Your tractor tire rim ottoman can be made more distinctive by including personal touches. For a sophisticated touch, think about running ornamental nailhead trim around the fabric’s edge. Stencils and paint allow you to create designs or patterns to the rim.
Functionality and Location
Now ready to be a useful and fashionable accent to your house is your new tractor tire rim ottoman. Arrange it as a footrest in your bedroom, extra sitting in your living area, or a patio conversation piece. There are countless possibilities!
In Summary
A satisfying do-it-yourself project combining imagination with utility is building a tractor tire rim ottoman. Using an old tire rim and a little bit of upholstery magic can create a distinctive and fashionable item that accentuates your house décor. This ottoman will be a great accent to any room regardless of your desired rustic, industrial, or eclectic style. Appreciate the attractiveness and use of your handmade ottoman and embrace the gratification of creating something unique with your own hands.