Regarding house décor, the appeal resides in the way imagination and utility are combined. Imagine turning an antiquated, dusty radio cabinet into a sophisticated martini bar. This do-it-yourself project not only gives a classic piece fresh life but also accentuates your house décor.
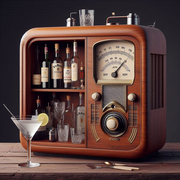 Any gathering would benefit from the “Shaken Stirred Radio Cabinet Martini Bar DIY,” which perfectly balances modernism with nostalgia. So let’s explore the process of producing this timeless work of art that will surely take front stage in your house.
Required Materials
Let’s compile all we need before we begin:
- Old radio cabinet
- Sandpapers
- Primer and paint (your color of choice)
- Shears for glass shelves
- Mirror panels
- Shaker, strainer, jigger, etc., or any bar tools
- Martini glasses
- LED lights (optional)
Preparing the Radio Cabinet
Getting the radio cabinet ready for its change comes first in this do-it-yourself project.
Remove any dust
To start, completely clean the cabinet to get any grime and dust out.
Smoothen the surface
To level any flaws and provide a basis for the primer and paint to adhere to, sand down the surface.
Eliminating the Previous Components
Here how you can remove the old parts that are not needed anymore:
Removing the unfunctional ones
Eliminate any obsolete parts like the speakers, radio dials, and wiring. You want a clean slate to deal with.
Take off doors and drawers
Remove any drawers or doors in the cabinet as well; they will be painted individually.
Priming and Painting
- Apply a coat of primer to guarantee the paint lasts longer and sticks properly once the cabinet is ready.
- Paint the cabinet with your selected color once the priming has set. For a streamlined style, use a basic black or white; for a statement, use a strong color.
- Before going on to the following phase, let the paint totally dry.
Putting the Bar Elements
It’s time to add the components that will transform the cabinet—which now looks modern and fresh—into a working martini bar.
Putting in the Glass Shelves
Calculate the cabinet’s internal size then cut the glass shelves to fit tightly. Making sure the shelves are level and stable, install them with adhesive strips or brackets. These shelves will carry your glasses and bar utensils, hence they should be strong.
Add Mirror Panels
Line the rear of the cabinet with mirror panels to accentuate elegance. This improves the appearance and gives the cabinet the idea of depth, therefore increasing its spaciousness.
Arranging the Glassware and Bar Tools
Stack your martini glasses and bar tools on the shelf. Additionally include a little tray for your jigger, strainer, and shaker. When you’re ready to create a cocktail, this not only keeps everything orderly but also makes access simple.
The Finishing Touches
Think of including some finishing details to really make your Shaken Stirred Radio Cabinet Martini Bar stand unique.
LED Lighting
Especially in the evening, adding LED lights within the cabinet can produce a remarkable effect. Choose lighting that change hue to complement the atmosphere of your event.
Personal Remarks
Personalize your new martini bar with some framed pictures, little plants, or old bar signs. These small elements might help your bar seem more inviting and customized.
Final Thoughts
A great way to repurpose an old radio cabinet and accentuate your home décor is with the Shaken Stirred Radio Cabinet Martini Bar DIY project. Your guests will be envy of your elegant and useful martini bar created with a little imagination and some elbow effort. To your new home bar and the many memories it will help produce!